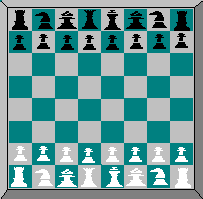
 The board consists of eight rows and eight columns for a total
of 64 squares of alternating colours. When the board is set up
it should be positioned so that a light square is positioned
on the extreme lower right hand side of the chess board
(as you can see, this works for both players).
The diagram shows how the pieces should be initially situated.
When you find out how all the pieces move you will notice that the
front rank is fully supported by the rank behind.
When setting up, make sure that the light queen is positioned on a
light square and the dark queen is situated on a dark square.
The two armies should be mirror images of one another.
The light side always moves first. Each player's side of the
chessboard is determined by chance. Usually by one player placing
a pawn in each hand and closing his fists. Holding forth his
fists the opposing player picks one. Whatever colour
the pawn he chooses is the side he shall command.
The board consists of eight rows and eight columns for a total
of 64 squares of alternating colours. When the board is set up
it should be positioned so that a light square is positioned
on the extreme lower right hand side of the chess board
(as you can see, this works for both players).
The diagram shows how the pieces should be initially situated.
When you find out how all the pieces move you will notice that the
front rank is fully supported by the rank behind.
When setting up, make sure that the light queen is positioned on a
light square and the dark queen is situated on a dark square.
The two armies should be mirror images of one another.
The light side always moves first. Each player's side of the
chessboard is determined by chance. Usually by one player placing
a pawn in each hand and closing his fists. Holding forth his
fists the opposing player picks one. Whatever colour
the pawn he chooses is the side he shall command.
|
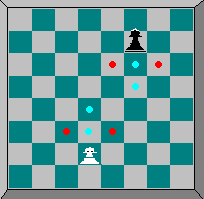 There are eight pawns situated on each side of the board.
They are the least powerful piece on the chess board, but
have the potential to become equal to the most powerful.
Pawns cannot move backward or sideways, but must move straight
ahead unless they are taking another piece. Generally pawns
move only one square at a time. The exception is the
first time a pawn is moved, it may move forward two squares
as long as there are no obstructing pieces. A pawn cannot
take a piece directly in front of him but only one at a
forward angle. In the diagram the green dots show where
the pawn may move and the red dots show where
the pawn may capture a piece. In the case of a capture
the pawn replaces the captured piece and the captured
piece is removed from play. Should a pawn get all the way
across the board to reach the opponent's edge of the table,
it will be promoted. The pawn may now become any
piece that the moving player desires (except a king or pawn).
Thus a player may end up having more than one queen on the board.
Under normal circumstances a player will want to promote his
pawn to be a queen since that piece is the most powerful and flexible.
The new piece is placed where the pawn ended its movement.
There is a separate rule regarding pawns called
en passant
that will be described separately.
There are eight pawns situated on each side of the board.
They are the least powerful piece on the chess board, but
have the potential to become equal to the most powerful.
Pawns cannot move backward or sideways, but must move straight
ahead unless they are taking another piece. Generally pawns
move only one square at a time. The exception is the
first time a pawn is moved, it may move forward two squares
as long as there are no obstructing pieces. A pawn cannot
take a piece directly in front of him but only one at a
forward angle. In the diagram the green dots show where
the pawn may move and the red dots show where
the pawn may capture a piece. In the case of a capture
the pawn replaces the captured piece and the captured
piece is removed from play. Should a pawn get all the way
across the board to reach the opponent's edge of the table,
it will be promoted. The pawn may now become any
piece that the moving player desires (except a king or pawn).
Thus a player may end up having more than one queen on the board.
Under normal circumstances a player will want to promote his
pawn to be a queen since that piece is the most powerful and flexible.
The new piece is placed where the pawn ended its movement.
There is a separate rule regarding pawns called
en passant
that will be described separately.
|
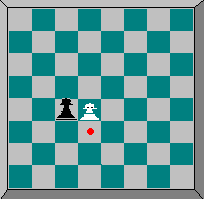 Perhaps the most obscure and least used move in chess is called
En Passant. It can only occur when a player exercises his
option to move his pawn two squares on its initial movement.
When this happens, the opposing player has the option to take
the moved pawn "en passant" as if it had only moved one square.
This option, though, only stays open for one move.
In the example diagram on the left, the light pawn has just moved
forward two squares. The dark pawn, may now move to the square with
the red dot and remove the light piece.
The en passant move was developed after pawns were allowed to move
more than one square on their initial move. This was done to make
sure they retained some of the restrictions imposed by slow movement,
while at the same time speeding up the game.
Perhaps the most obscure and least used move in chess is called
En Passant. It can only occur when a player exercises his
option to move his pawn two squares on its initial movement.
When this happens, the opposing player has the option to take
the moved pawn "en passant" as if it had only moved one square.
This option, though, only stays open for one move.
In the example diagram on the left, the light pawn has just moved
forward two squares. The dark pawn, may now move to the square with
the red dot and remove the light piece.
The en passant move was developed after pawns were allowed to move
more than one square on their initial move. This was done to make
sure they retained some of the restrictions imposed by slow movement,
while at the same time speeding up the game.
|
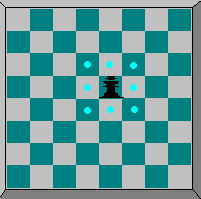
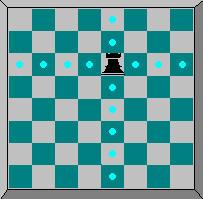 The rook, shaped like a castle, is one of the more powerful pieces
on the board. The rooks, grouped with the queen, are often thought
of as the "major pieces". Rooks are worth a bishop or a knight
plus two pawns. The rook can move any number of squares in a
straight line along any column or row. They CANNOT move diagonally.
In the example shown in the diagram on the left, the rook
can move or capture in any square that has a blue dot.
The simplicity of the rook's movement is indeed what
makes it powerful. It can cover a significant area of the
board and there are no areas which an opponent's piece -
moving one square at a time -
can slip through. The rook may also make a move in
conjunction with the king. This
maneuver will be explained in the section called
castling.
The rook, shaped like a castle, is one of the more powerful pieces
on the board. The rooks, grouped with the queen, are often thought
of as the "major pieces". Rooks are worth a bishop or a knight
plus two pawns. The rook can move any number of squares in a
straight line along any column or row. They CANNOT move diagonally.
In the example shown in the diagram on the left, the rook
can move or capture in any square that has a blue dot.
The simplicity of the rook's movement is indeed what
makes it powerful. It can cover a significant area of the
board and there are no areas which an opponent's piece -
moving one square at a time -
can slip through. The rook may also make a move in
conjunction with the king. This
maneuver will be explained in the section called
castling.
|
 The bishop may move any number of squares in a diagonal direction
until it is prevented from continuing by another piece.
Each player begins with two bishops, one originally situated on a
light square, the other on a dark square. Because of
the nature of their movement, the bishops always remain
on the same coloured squares.
Bishops are a powerful piece (though less so than the queen or rooks).
It is roughly equal in power to a knight or three pawns. Nevertheless,
the bishop is a great piece to have in open situations when it can
range the board. The knight is better in cluttered situations
where it can utilize its ability to jump over other pieces.
The bishop may move any number of squares in a diagonal direction
until it is prevented from continuing by another piece.
Each player begins with two bishops, one originally situated on a
light square, the other on a dark square. Because of
the nature of their movement, the bishops always remain
on the same coloured squares.
Bishops are a powerful piece (though less so than the queen or rooks).
It is roughly equal in power to a knight or three pawns. Nevertheless,
the bishop is a great piece to have in open situations when it can
range the board. The knight is better in cluttered situations
where it can utilize its ability to jump over other pieces.
|
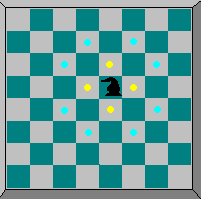 The knight is the only piece on the board that may jump over other
pieces. This gives it a degree of flexibility that makes it a
powerful piece. Since obstructions are not a bar to movement
(unless there is a friendly piece on the square where the knight
would move) the knight's path of movement has never been well defined.
The knight can be thought of as moving one square along any rank or
file and then at an angle, as defined in the diagram at left.
(The yellow dot is the square being passed over and the blue dot
is the space where the knight may move and may also capture
opposition pieces.) The knight's movement can also be viewed
as an "L" laid out at any horizontal or
vertical angle. Note that the squares to where the knight can
move are all of the opposite colored squares two steps away
from his starting square. This may help you visualise
the knight's range of influence on the board.
The knight is the only piece on the board that may jump over other
pieces. This gives it a degree of flexibility that makes it a
powerful piece. Since obstructions are not a bar to movement
(unless there is a friendly piece on the square where the knight
would move) the knight's path of movement has never been well defined.
The knight can be thought of as moving one square along any rank or
file and then at an angle, as defined in the diagram at left.
(The yellow dot is the square being passed over and the blue dot
is the space where the knight may move and may also capture
opposition pieces.) The knight's movement can also be viewed
as an "L" laid out at any horizontal or
vertical angle. Note that the squares to where the knight can
move are all of the opposite colored squares two steps away
from his starting square. This may help you visualise
the knight's range of influence on the board.
|
 The queen is, without doubt, the most powerful piece on the
chessboard.
She can move as many squares as she desires and in any direction
(barring any obstructions). In the diagram on the left,
the blue dots indicate to which squares this particular queen
may move. As you can see, she can cover 27 squares.
This is a healthy percentage of the board.
She captures in the same way that she moves,
replacing the unlucky opposing piece that got in her way.
(She must, of course, stop in the
square of the piece she has captured - unlike the knight
the queen does
not jump other pieces.)
The queen's power is so great that she is considered to be worth more
than any combination of three other pieces. Thus it would be better,
under normal circumstances, to sacrifice two rooks and a bishop (for
example) than to give up a queen.
Strategy Note: It is generally thought to be unwise to bring the
queen out too early. The cluttered board makes her more
vulnerable to entrapment.
The queen is, without doubt, the most powerful piece on the
chessboard.
She can move as many squares as she desires and in any direction
(barring any obstructions). In the diagram on the left,
the blue dots indicate to which squares this particular queen
may move. As you can see, she can cover 27 squares.
This is a healthy percentage of the board.
She captures in the same way that she moves,
replacing the unlucky opposing piece that got in her way.
(She must, of course, stop in the
square of the piece she has captured - unlike the knight
the queen does
not jump other pieces.)
The queen's power is so great that she is considered to be worth more
than any combination of three other pieces. Thus it would be better,
under normal circumstances, to sacrifice two rooks and a bishop (for
example) than to give up a queen.
Strategy Note: It is generally thought to be unwise to bring the
queen out too early. The cluttered board makes her more
vulnerable to entrapment.
|
 Though not the most powerful piece on the board, the king is the most
vital, for once he is lost the game is lost
(more about this in the end game section).
As shown in the movement diagram, the king can only move one square
in any direction. There is only one restriction on his movement -
he may not move into a position where he may be captured by an
opposing piece.
Because of this rule, two kings may never stand next to each other or
capture each other.
Strategy Note: Guard the king closely. His loss means loss of the
game. He is typically not a good piece to use on offense, but
will be a help in a carefully constructed defense.
Though not the most powerful piece on the board, the king is the most
vital, for once he is lost the game is lost
(more about this in the end game section).
As shown in the movement diagram, the king can only move one square
in any direction. There is only one restriction on his movement -
he may not move into a position where he may be captured by an
opposing piece.
Because of this rule, two kings may never stand next to each other or
capture each other.
Strategy Note: Guard the king closely. His loss means loss of the
game. He is typically not a good piece to use on offense, but
will be a help in a carefully constructed defense.
|
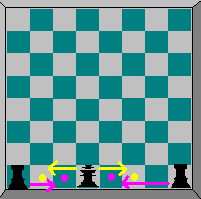 Castling is a special defensive maneuver. It is the only time in
the game
when more than one piece may be moved during a turn.
This move was invented in the 1500's to help speed up the game and to
help balance the offense and defense.
Castling is a special defensive maneuver. It is the only time in
the game
when more than one piece may be moved during a turn.
This move was invented in the 1500's to help speed up the game and to
help balance the offense and defense.
The castling move has some fairly rigid caveats:
- It can only occur if there are no pieces standing between the king
and the rook.
- Neither king nor rook may have moved from its original position.
- There can be no opposing piece that could possibly capture the
king in his original square, the square he moves through or the
square that he ends the turn.
The king moves two squares toward the rook he intends to castle with
(this may be either rook). The rook then moves to the square through
which the king passed. Hopefully, the diagram to the left makes this
clear.
Strategy Note: Castling is a great aid in defensive strategy.
It also has a tendency to bring a powerful rook into play when under
normal circumstances it might be stuck behind a wall of pawns.
|